Adhesive Auto Loader Manual
Download Pellet Loader Operating Manual
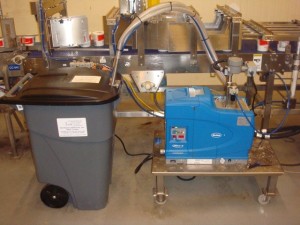
The Northwest Adhesives, Inc. automatic pellet loading system will fit most commercial hotmelt adhesive melters and provide these important benefits…
- Automatic filling pellets from 33 gal clear container with dust tight lid
- Sealed system will not permit foreign debris to enter the melter
- No air filter is required as the transport air returns to the supply container preventing dust from entering into the glue supply
- Improves melt capacity when melter is always full
- Eliminates oxygen from heated glue to preserve quality of melt
- SS caster dolly permits re-filling from a distant central location
- Ideal for Cool Melt adhesives which melt slower at reduced temperature
Operating Method:
The RF solid state point level controller accurately senses the solid or liquid pellet glue level inside your commercial melter and will automatically open and close the air solenoid valve to send 40-60 psig pneumatic air to a venturi pellet conveyor which then transports the pellets to re-fill the melter until the level is satisfied where it will shut off. There is a time delay, coarse and fine calibration settings pre-set from factory and perhaps adjusted during installation after which the system should function on its own with very little maintenance based on a proven, accurate and dependable level control used throughout industry for many years.
System Requirements:
- By customer: 120 VAC power + clean, dry air @ 60-80 psig
- Container should be located as close as possible to the melter
- SS loader lid assembly replaces your melter lid = no drilling and easy return to original configuration (save all original parts)
Installation:
- Remove lid and hinge on your melter (do not discard any original parts)
- Add SS loader lid assembly into melter opening, bend skirt to fit tight
- Install the 1” supply and return hoses and the 3/8” blue air hose to the suction wand and return fitting located on the supply container,
- Cut to length both transport hoses to fit neatly onto SS lid so that pellets fly to melter smoothly with minimum bends, avoiding low points in the hoses. Secure hoses with electrical ties with no kinks.
- Plug in the unit to 120 VAC power and allow it to warm up for 15 minutes
Calibration (normally not required):
Set at our factory, loader likely will not require any calibration, but if necessary remove screw cap on level controller to access these calibration adjustment screws:
- Turn Delay (DLY) fully counterclockwise = no delay
- Pre-set the Fine (F) screw full clockwise and the Coarse (C) pot (remove label) to the mid-point position (12 o clock)
- With melter ½ full of adhesive adjust the Coarse (C) screw such that the LED just turns GREEN and stays GREEN and do not adjust (C) again. Replace label over Coarse (C) pot screw.
- Adjust the Fine (F) screw counter clockwise such that the LED light just turns RED and back clockwise until it just turns GREEN.
- Mark this as the #1 position with a pencil mark.
- Fill the melter with glue pellets so that it is 2” below the lid………then
- Adjust the Fine (F) screw counter clockwise such the LED light just turns RED and make #2 pencil mark and then turn Fine (F) screw halfway between the #1 and #2 pencil marks.
- This should be your final Fine (F) position. The LED should now be GREEN, if not repeat steps 7-12.
- Turn on air and check that regulator pressure = 50 psig
- Finally adjust Delay (DLY) until proper filling matches pellet consumption without over filling or under filling. This Delay should be 6-10 seconds from LED light change until it shuts off or turns on the air flow.
- Put cap back onto level controller and hand tighten. System should be ready to operate, however you will need to closely monitor level for several filling cycles to make sure it gives proper level control under normal operations.
- If slight level adjustments are needed, SLIGHTLY turn only the Fine (F) screw counterclockwise for higher level or clockwise for lower level. If system does not operate correctly after close supervision, recalibrate by repeating steps 7-1
Maintenance:
- Make sure no air leaks occur, repair
- If venturi isn’t sucking and conveying, check for pellet blocking, clear jams
- Clean the dust or fine particles which may lodge inside the venturi
- Make sure pellets have a smooth flow path, no kinks or low points in hoses
- Keep container at least ¼ to ½ full at all times
- If rolling container to a filling station, shut off air, remove all 3 hoses from wand
- do not overfill container which could then be too heavy to roll
- Make sure 2 transport and 1 air hose are then reconnected properly
- Do not permit paper dust to enter glue supply lid should be closed at all times
Trouble shooting:
Pellet level is TOO FULL or does not shut off (overfills)
- turn Fine (F) screw SLIGHTLY clockwise until LED turns GREEN this should stop air flow and pellet filling. Watch that level does not drop too far if Fine (F) screw is turned too much.
- Reduce Delay (DLY) setting so overfilling after red light turns on will reduce
- Failing these above steps, repeat calibration steps 7-12
Pellets DO NOT FILL (with sufficient air flowing)
- if air turns on but no pellets flow, remove plastic hose from 1” supply tube, break up any blocking using a ½” x 3 ft. long metal rod pushing down through venturi to loosen blocking of pellets in bottom of container
- if pellets are jammed in the return hose or inside SS lid assembly, clear
- if no pellets still will not feed with air flowing, look for air leaks or inadequate CFM supply of air
- As a final correction, you can slightly drill out the vibrator brass plug hole to effect more vibration, but never drill out plug hole larger than 0.110” (7/64”)
Pellets DO NOT FILL (there is no air flowing)
- if air does not turn on, make sure air valve and air supply is not shut off
- with pellets at lowest level inside melter, adjust Fine (F) screw counter clockwise until LED light just turns RED = air will now turn on after delay = pellets fill
Pellet Level TOO LOW or can not keep up with melt demand
- turn Fine (F) screw SLIGHTLY counter clockwise and monitor new level for 2-3 fills, repeat this adjustment again if level still too low under peak demand
- Increase Delay (DLY) time (turn clockwise) to fill longer before shutting off
- Break up blocking of pellets in container with or increase vibration level by drilling out brass plug (not over 0.110” (7/64”) diameter)
Can’t get system to work:
Please contact Northwest Adhesives, Inc. if you need further assistance
Phone: (360)-260-1227 or if after hours call: (360)-609-5481 or
Email to chuck@northwestadhesives.com